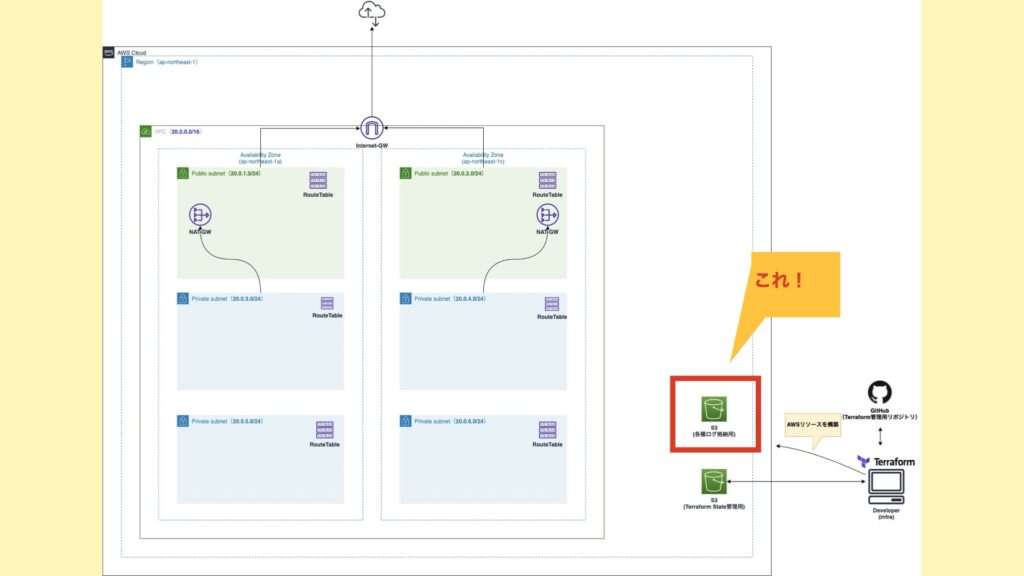
今回は、各種ログを格納するS3バケットを作成していきます。
以前の記事でもS3バケットを作成しましたが、こちらはWebコンソールからの作成になっています。
今回使用するコードです。

前提
- 前回までの記事を読んでいること!
今回の目標
以下のリソースを作成します。
- S3バケット
事前準備をする
ログ管理用のS3バケットには、これから色々なログが格納されていきます。そのため、共通的なリソースという位置づけにしたいと思います。よって、共通リソースとしてmoduleを分割します。
ディレクトリ構成を変更する。
まず、ディレクトリ構成で追加になる部分は以下の通り。
.
├── modules
│   ├── common            ★今回追加するディレクトリ
│   │   ├── output.tf     ★今回追加するファイル
│   │   ├── s3_logging.tf ★今回追加するファイル
│   │   └── variables.tf  ★今回追加するファイル
│   └── web
│       ├── ec2_iam.tf
│       ├── ec2_launch_template.tf
│       ├── ec2_sg.tf
│       ├── output.tf
│       ├── template
│       │   └── userdata.sh
│       └── variables.tf
└── staging
    ├── example.tfbackend
    ├── main.tf
    ├── staging.tfvars
    └── variables.tf
moduleを追加する。
続いて、terraform/system/staging/main.tf にてmoduleを追加します。
terraform {
  backend "s3" {
  }
}
provider "aws" {
  region = "ap-northeast-1"
  assume_role {
    role_arn = var.iam_role_for_terraform
  }
  default_tags {
    tags = var.common_tags
  }
}
data "terraform_remote_state" "network" {
  backend = "s3"
  config  = var.network_remote_state_config
}

module "web" {
  source        = "../modules/web"
  common_tags   = var.common_tags
  vpc_id        = data.terraform_remote_state.network.outputs.vpc_id
  ami_id        = var.ami_id
  instance_type = var.instance_type
  key_name      = var.key_name
  cluster_name  = var.cluster_name
  source            = "../modules/web"
  common_tags       = var.common_tags
  vpc_id            = data.terraform_remote_state.network.outputs.vpc_id
  ami_id            = var.ami_id
  instance_type     = var.instance_type
  key_name          = var.key_name
  cluster_name      = var.cluster_name
}

+ module "common" {
+   source         = "../modules/common"
+   logging_bucket = var.logging_bucket
+ }
S3バケット用の変数を追加する。
S3バケットで環境毎に変えたい設定値を変数に追加します。
terraform/system/staging/variables.tf
...

+ variable "logging_bucket" {
+   type = map(string)
+   default = {
+     name                     = "study-infra-logging"
+     expiration_days          = 90 # 3ヶ月
+     transition_days          = 30 # 1ヶ月
+     transition_storage_class = "GLACIER"
+   }
+ }
細かい解説は後ほどします。
また、以下のファイルにも忘れずに追加します。
terraform/system/modules/common/variables.tf
variable "logging_bucket" { type = map(string) }S3バケットを作成する。
それでは準備も終わったので、S3バケットを作成していきたいと思います。
使用するリソースは、 aws_s3_bucket です。
terraform/system/modules/common/s3_logging.tf
resource "aws_s3_bucket" "logging" {
  bucket = var.logging_bucket["name"]
  acl    = "private"

  # 格納するオブジェクトのバージョン管理を行うかどうかの設定。
  # 今回格納するものは、ログファイルのためバージョン管理する必要がないと判断し無効に設定。
  versioning {
    enabled = false
  }

  # ライフサイクル設定。解説は後述。
  lifecycle_rule {
    enabled = true
    expiration {
      days = var.logging_bucket["expiration_days"]
    }
    transition {
      days          = var.logging_bucket["transition_days"]
      storage_class = var.logging_bucket["transition_storage_class"]
    }
  }

  # 遠隔地へのデータ転送の高速化機能。
  # 今回は遠隔地へ転送したりしないため無効。
  acceleration_status = "Suspended"

  # サーバ側の暗号化設定。解説は後述。
  server_side_encryption_configuration {
    rule {
      bucket_key_enabled = false
      apply_server_side_encryption_by_default {
        sse_algorithm = "AES256" # SSE-S3を使用。
      }
    }
  }
}
ポイント部分を解説していきます。
ライフサイクル設定
まずは、ライフサイクルから。特定の期間を設定し、その期間を超えたらオブジェクトのストレージクラスを変更したり、削除したりすることができます。上手く利用することで、費用を下げることも可能になります。
今回は以下の図のように設定していきます。

オブジェクトの保管期限を設定します。変数を利用していますが、90日(約3ヶ月)が設定されます。
    expiration {
      days = var.logging_bucket["expiration_days"]
    }
ストレージクラスの移行設定をします。移行する日数は30日(約1ヶ月)、移行するストレージクラスはGLACIERが設定されます。
    transition {
      days          = var.logging_bucket["transition_days"]
      storage_class = var.logging_bucket["transition_storage_class"]
    }
ちなみにストレージクラスをStandardからGlacierに移行すると、費用の差が以下になります。(結構変わります。)
| ストレージクラス | ストレージ料金 |
|---|---|
| Standard | 0.025USD/GB |
| Glacier | 0.0045USD/GB |
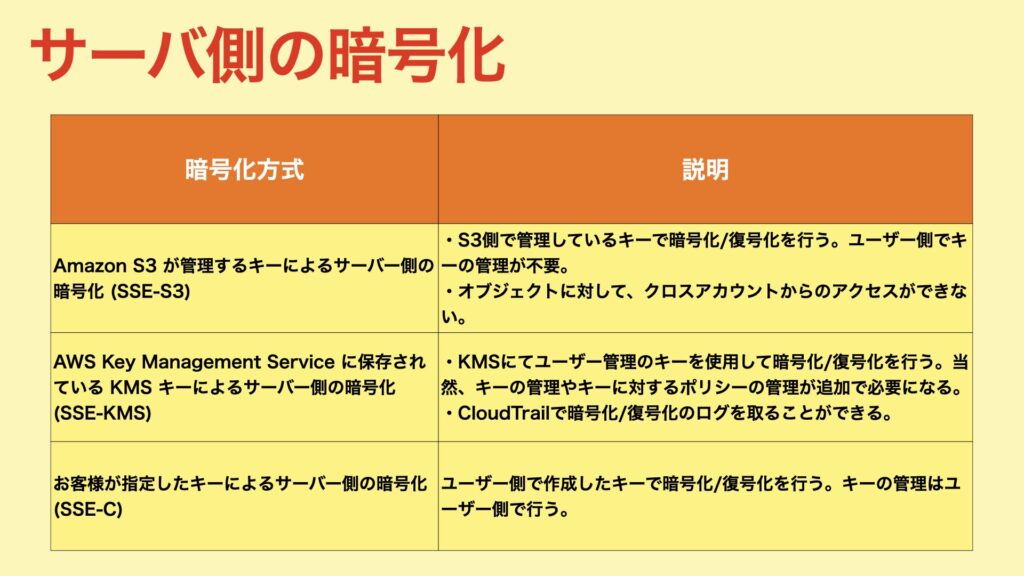
サーバ側の暗号化設定
S3バケットにオブジェクトが保管されるときに、自動でS3が暗号化を行います。また、オブジェクトを取り出すときに、自動でS3が復号化も行います。
暗号化方式は3種類あります。今回は、「キーの管理の手間がない。」、「コスト削減」の理由によりSSE-S3を選択しました。
terraform/system/modules/common/s3_logging.tf
  server_side_encryption_configuration {
    rule {
      # SSE-KMSを使用しないため無効。
      bucket_key_enabled = false

     # デフォルトの暗号化の設定。
     apply_server_side_encryption_by_default {

        # SSE-S3を使用するため「AES256」を設定。
        # (SSE-KMSの場合は「aws:kms」を設定する。)
        sse_algorithm = "AES256"
      }
    }
  }
パブリックアクセスブロックを設定する。
一括でパブリックへのアクセスを設定することができる機能。S3は、バケットポリシーやACL、オブジェクト単位でのアクセス許可が設定できます。設定箇所が複数あるため、意図せずにインターネットに公開してしまう。。ということを防ぐことができます。
今回はログ格納用のS3バケットであり、パブリックにする理由がないため有効にしています。
terraform/system/modules/common/s3_logging.tf
+ resource "aws_s3_bucket_public_access_block" "logging" {
+   bucket                  = aws_s3_bucket.logging.id
+   block_public_acls       = true
+   block_public_policy     = true
+   ignore_public_acls      = true
+   restrict_public_buckets = true
+ }
Terraformを実行する。
1. /study-infra-aws-tutorial/terraform/system/staging/example.tfbackendを修正する。
- bucket:Stateを管理するS3バケット名に変更する。
- role_arn:Terraform実行用RoleのARNに変更する。
bucket   = "sample-bucket"
region   = "ap-northeast-1"
key      = "study-infra-tutorial/system/staging.tfstate"
encrypt  = true
role_arn = "arn:aws:iam::111111111:role/study-infra-terraform-role"
2. /study-infra-aws-tutorial/terraform/system/staging/staging.tfvars を作成する。
- iam_role_for_terraform:Terraform実行用RoleのARNに変更する。
- bucket:Stateを管理するS3バケット名に変更する。
- role_arn:Terraform実行用RoleのARNに変更する。
iam_role_for_terraform = "arn:aws:iam::111111111:role/study-infra-terraform-role"

network_remote_state_config = {
  bucket   = "sample-bucket"
  key      = "study-infra-tutorial/staging.tfstate"
  region   = "ap-northeast-1"
  role_arn = "arn:aws:iam::111111111:role/study-infra-terraform-role"
}
3.Dockerイメージをビルドする。
$ docker build \
  -t study-infra-tf:${IMAGE_VERSION} \
  --build-arg AWS_ACCESS_KEY=${AWS_ACCESS_KEY} \
  --build-arg AWS_SECRET_ACCESS_KEY=${AWS_SECRET_ACCESS_KEY} \
  --build-arg ENV=${ENV} \
  .
4.コンテナを起動して接続する。
$ pwd
-> 「***/study-infra-aws-tutorial」に居ること。

$ docker run --rm -v $PWD/terraform:/tf -it [ImageID] ash
5.Terraformを初期化する。
$ cd /tf/system/stating

$ terraform init -backend-config=example.tfbackend
Initializing modules...
- network in ../modules

Initializing the backend...

Successfully configured the backend "s3"! Terraform will automatically
use this backend unless the backend configuration changes.

Initializing provider plugins...
- Finding latest version of hashicorp/aws...
- Installing hashicorp/aws v3.68.0...
- Installed hashicorp/aws v3.68.0 (signed by HashiCorp)

Terraform has created a lock file .terraform.lock.hcl to record the provider
selections it made above. Include this file in your version control repository
so that Terraform can guarantee to make the same selections by default when
you run "terraform init" in the future.

Terraform has been successfully initialized!

You may now begin working with Terraform. Try running "terraform plan" to see
any changes that are required for your infrastructure. All Terraform commands
should now work.

If you ever set or change modules or backend configuration for Terraform,
rerun this command to reinitialize your working directory. If you forget, other
commands will detect it and remind you to do so if necessary.
$
6. terraform plan を実行する。
planの結果、エラーが無いようであればOKです。
$ terraform plan -var-file=staging.tfvars

...

Plan: 2 to add, 0 to change, 0 to destroy.

───────────────────────────────────────────────────────────────────────────────────────────────────────────────────────────────────────────────────────────────────────────────────────────

Note: You didn't use the -out option to save this plan, so Terraform can't guarantee to take exactly these actions if you run "terraform apply" now.
$
7. terraform apply を実行してリソースを構築する。
$ terraform apply -var-file=staging.tfvars

...

Do you want to perform these actions?
  Terraform will perform the actions described above.
  Only 'yes' will be accepted to approve.

  Enter a value: yes ←入力してEnterキーを押下!

...

Apply complete! Resources: 2 added, 0 changed, 0 destroyed.
$
以上で、ログ格納用のS3バケットが作成できました。
これにて本記事は終了です。

コメント